01 Listing Template Designer
Template Designer
Soldeazy provides users with designing templates function. Users could design a professional and unique listing template according to your needs.
|
I. Listing templates in SoldEazy can be classified into two types: Code-Free designer and HTML Designer. II. l Code-Free Designer [applicable to users without knowledge of HTML ] SoldEazy’s template design system does not require any programming knowledge. Even if you are a new user, you can design a characteristic and professional listing template in 15 minutes just by dragging and dropping. l HTML Designer [ applicable to users with certain programming knowledge ] Users can design a unique listing template by HTML codes and apply to SoldEazy datasheets * Soldeazy does not offer any advice on users’ HTML templates.
|
|
|
|||
|
I. Login to SoldEazy and go to Template Tools > Designer. Click <Listing Template Designer> II. Choose Code-Free Designer . Click < Next >.
III. According to your need to make the settings: Side Bar, Photo Display and policy. Click < ok > when you completed.
**SoldEazy is now offering 20 free pre-set listing templates for your choice
IV. You may preview your design on the right of the page. If you need to revise the previous settings, you may click < Layout > anytime during the process of design. V. The setting bar on the left is a control panel. You may step by step design your own characteristic template by modifying the settings in the control panel. i. Basic – Modify the top, background and the policy section ii. S ide Bar – Modify the color, word size and the background of the side bar. Add functional box to the side bar iii. Body – Design the title, background in the description. Add functional box to the main body section iv. Mobile Template – Modify and design what are shown in the mobile templates v. Setting – Advanced setting of the listing template |
|
||
|
i. Basic
SoldEazy now provides editor for photos uploaded as Shop Name Banner Click the brush icon
You can edit the picture and save as a new one
|
|
||
|
ii. S ide Bar
|
|
||
|
Store Cat. — A eBay store category is shown in the sidebar. You may edit the layers of the displayed category
|
|
||
|
Picture — Click < upload > to upload the pictures shown in the sidebar
|
|
||
|
Text Link – Add a text link to the sidebar. Buyers are directed to the page you added
|
|
||
|
Hot Item – 5 items with the best purchase history are displayed |
|
||
| New List Item – 24 new items are displayed with a kaleidoscopic effect.
|
|
||
|
Custom Item – Fill in the specific item ID and click + to add more items. Items added to the box are displayed in a merry-go-round style. |
|
||
| iii. Body * This section is directly extract from the datasheet. The preview content is a sample for users adjusting descriptions positions and fonts Edit the format of the titles and descriptions
|
|
||
|
Basic Description –main descriptions of the item |
|
||
|
Item Specifics – Modify the item specifics table’s border type, color and positions. |
|
||
|
Attribute T able – You may first create a list of attributes. Choose and add the appropriate attributes to the templates (Please refer to manuals about attribute tables)
|
|
||
|
Picture Banner – Add a picture banner to the template and every listings applied this template display the same picture banner
|
|
||
|
Megashowcase: The system showcases related products automatically. You can set rules to adjust the number of columns and rows. |
|
||
|
Poster – it is uploaded in the datasheet
|
|
||
| iv. Mobile Template User can choose to turn on/ off mobile template for a specific template at any time.
You can view the mobile template status in template management page
The following order is displayed when buyers check the items with their mobiles. * Drag the box to adjust the position
|
|
||
|
v. Setting |
|||
VI. How to remove an elementWhen you have set up elements that you need, but you have to remove some elements that you don't want now, please use your mouse to hover over the element, a dust bin icon will show up, click the dust bin icon, this element will be deleted.
|
|||
|
I. Login to SoldEazy and go to Design > Template Designer. Click <Create a template> II. Choose Html Designer and click <Next> III. Design an HTML template * Soldeazy does not provide users with any HTML checking or support.
|
|||
|
I. Go to Datasheet > Datasheet Item. Search for the datasheet that you would like to revise the template. Click the pencil icon to go to the edit page of the datasheet.
II. Go to <Template> and choose an appropriate template ID.
III. Click <Save and Sync> to synchronize the listing template to eBay * Click <Save and Verify> if the datasheet is unlisted |
|||
|
I. Go to Datasheet > Datasheet Item and check the datasheets that you would like to apply the new templates. Click the < Edit > button at the bottom of the page. II. Select < Listing Template > in the < Apply to Field > III. Select < Listing Template > in New Value . Choose the appropriate template ID and click < Save and Sync > IV. You may preview the effects by clicking the magnifying glass icon when the bulk job is completed. |
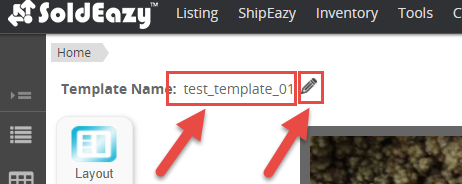
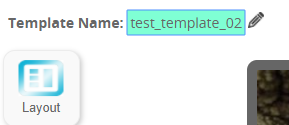
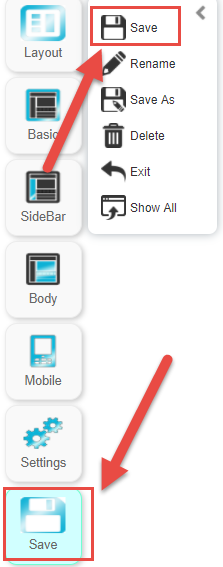
You can go to editor mode, then use either of the following method:
**"HTML template" does not support renaming at the moment. |
** End **
Article Number: 78
Posted: Tue, Nov 14, 2017 5:18 PM
Last Updated: Tue, Oct 23, 2018 3:48 PM
Posted: Holistic Tech [info@holistictec.com]
Online URL: https://www.soldeazy.com/support/article.php?id=78


